Lab 4
In this lab, you will use serial communication to send at least two sensor values from Arduino to P5JS. Using P5, you must create an interactive, visual output from the incoming sensor data.
Lab Objectives:
- Explore serial communication between Arduino and P5
- Learn how to appropriately format data to send between devices
- Build an interface using P5
Lab Resources:
- Serial Output from Arduino to P5 as Binary
- Serial Output as ASCII
- Github Repo with Serial to P5 Example Code
Hint: use these video resources!!!
The Arduino Side:
Build a circuit with two analog sensors. Print the values to the Serial Monitor in Arduino to ensure that you are getting good values. Ensure that your data is properly formatted in your serial print messages.
Suggestion: Get serial communication working with one sensor first, then incorporate the second!
You will be sending these values serially to P5, and since you are sending multiple values, you should send your data as an ASCII string and parse the data in P5. Pay attention to how you format your data in the Serial Monitor before moving to P5.
The P5 Side:
Using the P5 web editor, connect to the Serial Port that your Arduino is sending data to, read and parse the values into P5. Then, design an interface that visualizes the data from your Arduino circuit. Simple is okay, just focus on building something responsive, intuitive, and different than the examples covered in class.
P5 Serial Setup:
We will be using the p5 web editor. In order to get serial communication working between P5 and Arduino, you must have the serialcontrol app open in the background (see below). You also need to ensure that your P5 app includes the serialport.js library.
Here is a base template to start from
Serial Control app
Download and install the p5.seriacontrol App on your machine. This little app makes our life easier by establishing communication between the serial port and the web browser. You can also run p5.serialserver in the commandline, there are notes about how to do that here.
If you are on a windows machine, you can press the esc key twice to toggle between visible options.
serialport.js
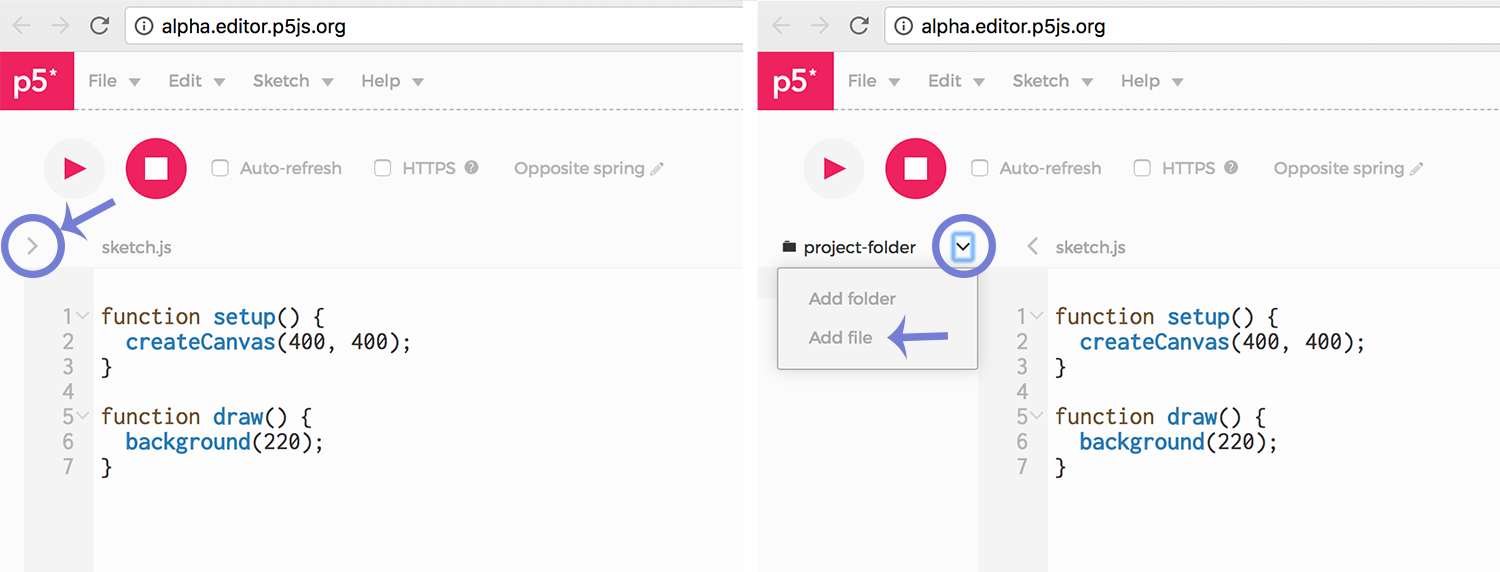
Your P5 project must include the serialport.js file which is available for download here: p5.serialport.js. Add it to your sketch by clicking the file navigation arrow on the left of the screen, then click the down arrow to add files. Choose the downloaded p5.serialport.js file and upload it to your sketch.

Once you’ve added this file, you will need to write a link to include it in your index page. In the <head> of the index page, after the script tags that link to the p5 library, add this line:
<script language="javascript" type="text/javascript" src="p5.serialport.js"></script>
Save index.html. Now you’re ready to edit the sketch.
Serial Events
P5 is built on JavaScript, a language that relies heavily on events and callback functions. An event is generated by the operating system when something significant happens, like a serial port opening, or new data arriving in the port. In your sketch, you write a callback function to respond to that event. The serialport library uses events and callback functions as well. It can listen for the following serialport events:
- list – the program asks for a list of ports.
- connected – when the sketch connects to a webSocket-to-serial server
- open – a serial port is opened
- close – a serial port is closed
- data – new data arrives in a serial port
- error – something goes wrong.
Here’s the code for this:
var serial;          // variable to hold an instance of the serialport library
var portName = 'YOUR PORT';  // fill in your serial port name here

function setup() {
  serial = new p5.SerialPort();       // make a new instance of the serialport library
  serial.on('connected', serverConnected); // callback for connecting to the server
  serial.on('open', portOpen);        // callback for the port opening
  serial.on('data', serialEvent);     // callback for when new data arrives
  serial.on('error', serialError);    // callback for errors
  serial.on('close', portClose);      // callback for the port closing

  serial.list();                      // list the serial ports
  serial.open(portName);              // open a serial port
}
Then, below the draw function, we need to include our callback functions.
function serverConnected() {
  console.log('connected to server.');
}

function portOpen() {
  console.log('the serial port opened.')
}

function serialEvent() {
  //this is where we read from the serial port!!
}

function serialError(err) {
  console.log('Something went wrong with the serial port. ' + err);
}

function portClose() {
  console.log('The serial port closed.');
}
Lastly, we actually need to read the data in P5. This happens in the serialEvent callback. Make a global variable at the top of your function, such as inData and add the following line in the serialEvent function for reading binary data from the serial port.
inData = Number(serial.read());
Use serial.read() if you are using Serial.write() on the Arduino side. Use serial.readLine() in P5 if you’re using Serial.print or Serial.println on Arduino.
Check out the Github Repo for more example code.
You can then print that value or use it in another function (such as the diameter of an ellipse) in the draw loop.
Lab 4 is due before class on Thursday March 22nd
Your blog response should include a clear video of what you made (show both the Arduino and P5 side), a schematic diagram, a brief written description of what you made, and all of your code embedded with GitHub Gist or shared via the P5 web editor. Submit a link to your blog post on Canvas.